Sunday, July 28, 2013

Techmell

Techmell


Add Gmail Account to Mail app in Metro Start Screen of Windows 8.1

Posted: 27 Jul 2013 06:37 PM PDT

The users can experience a wide range of latest features in Windows 8.1 which were not introduced earlier in previous versions of Windows. Specifically the "Mail" feature that has been added to its Metro UI where you can easily use all of your current email ID. You can not only use your Yahoo account, but also Hotmail, Gmail, AOL and many other accounts remain updated about your emails.

In Windows 7, MS Outlook Express was performing the same function and this has been now converted into Windows Mail. Though it is not working very effectively, but still it is amazing to get all of the currently active email accounts at one place. It gives more convenience to the users.

Here you will find instructions to add a Gmail account to the Windows Mail app.

Step 1: First, you need to click the "Start" button to open "Metro UI".

Start button in Windows 8.1Step 2: Here you will see "Mail" app. Click to open it.

Mail app in Apps Section in Windows 8.1Once the app starts, a screen appears before you where you will view the previously added email account that you inserted while completing the Windows installation. It may be Yahoo or Hotmail Email account. Now you are going to add a Gmail account to it.

Step 3: When you move the cursor of your mouse to the bottom of the screen at right side, the charms bar will appear before you where you need to click the option "Settings".

Settings in Mail app in Windows 8.1Step 4: Now you will see some options including "Accounts". Click on it in order to proceed.

Accounts option in Settings in Windows 8.1Step 5: There will be another option "Add an account". Click on it.

Add an Account option in Windows 8.1 Mail SettingsStep 6: Now you will be led towards another window where there will be some icons such as Hotmail, Outlook, Google, AOL, etc. You need to click "Google" to go ahead.

Add Google account in Windows 8.1Step 7: Now provide the required information to the given boxes. Write your email address to the bar and give its password too. Once you have done with it, click the option "Connect" at the bottom of the screen as it has been shown in the image below.

Connect to your Google Account in Windows 8.1Bingo! You have successfully added your Gmail account to the "Mail" app in Metro Start Screen in Windows 8.1.

Gmail Account in Mail app in Windows 8.1

The post Add Gmail Account to Mail app in Metro Start Screen of Windows 8.1 appeared first on Techmell.

How to Add & Use Pokki Start Menu in Windows 8.1

Posted: 27 Jul 2013 05:42 PM PDT

Pokki works amazing in Windows 8.1. The users who are not comfortable with the Start button and the Metro UI in Windows 8.1 will surely prefer using Pokki Start Button in their systems. It allows them to access their most wanted apps and features in no time. You can add your favorite and most wanted programs, files and folders in Pokki Start Button and it will show you all of them with a click of the mouse. You do not need to go to the Apps menu again and again to access any app now. Moreover, it also offers you a number of popular apps you can download them by double clicking on it. It is undoubtedly a superb app for the users who are fed up of the advanced Metro UI in Windows 8.1. They can download Pokki Start Button and can enjoy the display of live tiles. It enables the users to access quickly the installed apps, Start Screen and the Start Menu.

Steps to Install Pokki Start Button in Windows 8.1

Step 1: First you need to click Here to download Pokki Start Button app.

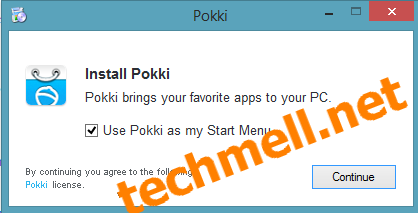
Step 2: Now you will see a dialog box where you need to show your consent for downloading this app by clicking the button "Continue".

Install Pokki in Windows 8.1Step 3: Now a new screen will appear before you where you will see how it looks like when the installation completes. It will also show that the system is downloading Pokki Start Button.

Downloading Pokki in Windows 8.1How to Use Pokki Start Button in Windows 8.1

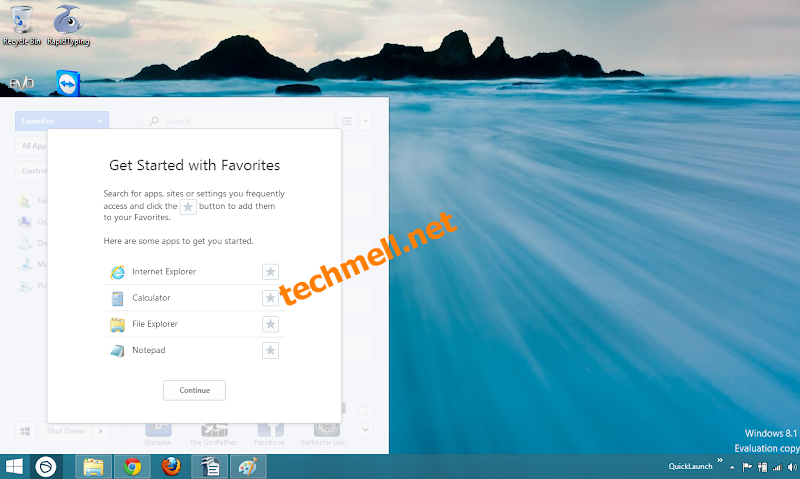
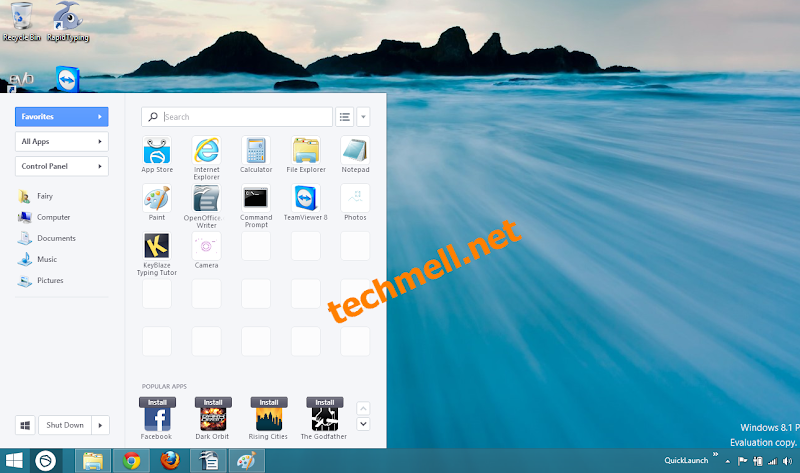
  • Once you have installed it, A round button appears next to your Start button on the taskbar. If you click on this button, it will show you the window shown in the screenshot below. You will see a few apps that are mostly used in any system. If you click the stars before them, these apps will be added to the "App Section" in Pokki Start Button. Click the option "Continue" once you have done with it.

Add Favorites in Pokki in Windows 8.1

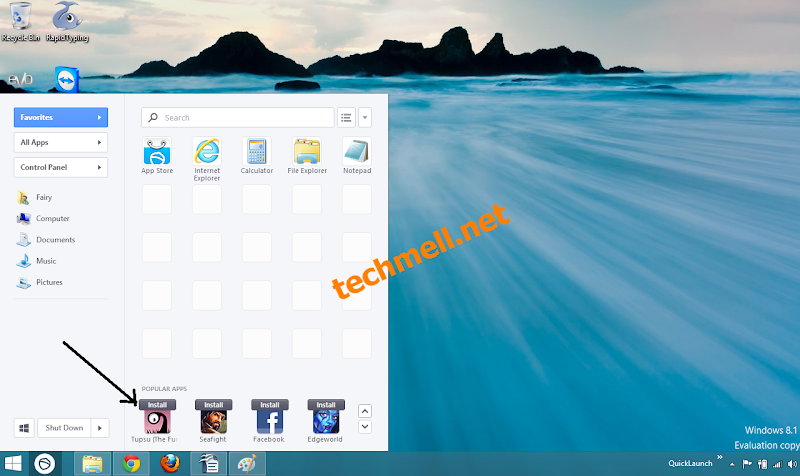
  • At the bottom of the Pokki Start Screen, you will see some popular apps that can be installed and added to the app section in this Start Button. You can add these apps by double clicking on them.

Install Apps to Pokki Start Screen in Windows 8.1

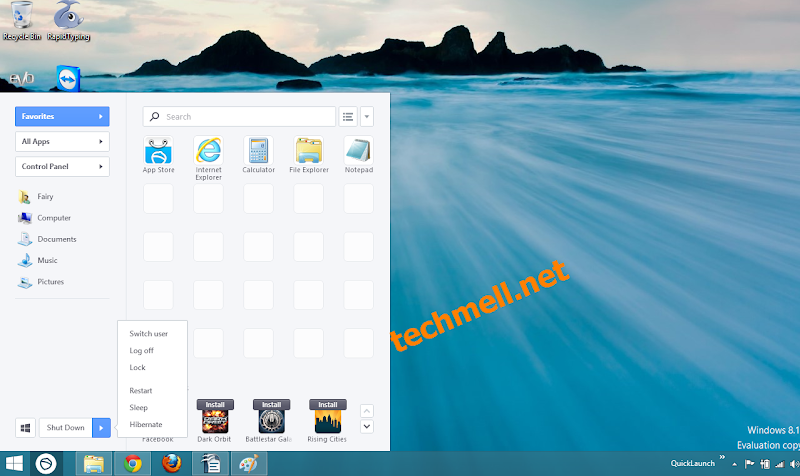
Shutdown, Hibernate Options in Pokki in Windows 8.1

  • At the top of the Pokki Start Screen you will see the option "Search". This option can be used to search your desired apps that you mostly use. These apps can be added to the app section.

Search Apps Option in Pokki Start Screen in Windows 8.1

The post How to Add & Use Pokki Start Menu in Windows 8.1 appeared first on Techmell.

iOS Dev Center is Back and Running; iOS 7 Beta 4 Near to Release

Posted: 27 Jul 2013 11:05 AM PDT

Following the hack attack, Apple puts all services down till it ensured all the issues were fixed and maximum security has been achieved. In the past 24 hours, a number of services were back on including the Dev Centers – seems like Apple is back in full action!
Services coming online again mean iOS 7 Beta 4 seeding. We might see the much awaited Beta 4 coming out soon. Following the issue at hand, the news has been circulating regarding a delay in iOS 7 Beta 4 release along with concerns over the progress in the development of the software in the face of the delay.

iOS 7 SDK

No word from Apple regarding the rumors has surfaced but that has always been the case however, resuming the iOS 7 Beta 4 more towards a confirmation as Apple itself officially stated

As usual Apple has been ever quiet regarding the authenticity and progress of such rumors, but has at the very least confirmed that the seeding will resume shortly once more as of now that several Dev Center services are back up and running once more including the download of softwares.

A memo was sent out to the registered developers of Apple, in its Apple confirmed that the Dev Center now has functional iOS and Mac sections (including downloads), Certificates, Identifiers and Profiles, a Safari Dev Center, and others.
As of now Apple is still offering its latest iOS 7 beta 3 as a download to develop alongside Xcode 5 Developer Preview 3.

The post iOS Dev Center is Back and Running; iOS 7 Beta 4 Near to Release appeared first on Techmell.

Saturday, July 27, 2013

Techmell

Techmell


GoodBye to Google+ Local: Leaving iOS on 7th August

Posted: 26 Jul 2013 04:26 PM PDT

Google has made some very serious decision regarding putting a stop to certain apps, amongst those is Google+ Local service Google specifically devised for iOS few months back. It appears the service has to go down the line of early retirement as Google announced the withdrawal of this iOS service on the 7th Of August.

Google+ Local

Credit: cobalt.com

This information has been confirmed by an email being received by users of Google Maps declaring all services including localized dining, shopping and entertainment discover application will cease to work by August 7. The decision has been based on the consequences of the same features being incorporated in the updated version of iOS Google Maps.

Although users will not be able to use Google+ Local for iOS service from August 7 onwards, still, all the user data including reviews, any ratings or related information will automatically be saved on Google+, being available to users when they log into Google Maps again.

Google+ Local is not the first service to be shut down in fact Google has put down a number of other services over a couple of months. These include services like Google Reader followed by Google Latitude.  Continuing Google+ Local, though, would have been of no use since all the data it provided is now readily available in Google Maps for iOS. The app might already be taken out from iTunes since any link directing to the app says, "the item you've requested is not currently available in the U.S. Store."

The post GoodBye to Google+ Local: Leaving iOS on 7th August appeared first on Techmell.

MetroPCS soon to Launch Nokia Lumia 521 and LG Optimus L3

Posted: 26 Jul 2013 04:12 PM PDT

Currently T-Mobile acquires MetroPCS is going to add two more Smartphones to its shelf in a matter of just a few hours. The carrier is going to make available its first ever Windows Phone 8 Smartphone, Nokia Lumia 521 along with an LG Smartphone LG Optimus L3. The mentioned devices have not yet appeared on the official MetroPCS website, it is going to occur anytime soon though.

Lumia 521 with a reputation of being the cheapest Windows Phone 8 Smartphone in the U.S. So far is already available at T-Mobile. MetroPCS, however, offers a price tag of just $99 and that too, with no contract. This price is still $50 below the price revealed at the launch of the device with magenta carrier. With such offers Lumia 521 is going to share the fame the most affordable Lumia Smartphone with At&T's new Lumia 520.

Lumia 521Specifications-wise, Lumia 521 as shown in the image houses a 4-inch 480×800 display screen, a RAM of 512MB backed by 1GHz dual-core processor, 8GB internal storage expandable with a MicroSD card, 1230mAh battery and a 5 megapixel camera.

The second Smartphone available at MetroPCS is LG Optimus F3 that has only been released by Sprint so far. Optimus L3 comes with a 4-inch 480×800 IPS display screen, houses a 1.2 GHz dual core processor, the device also has a 5 megapixel camera capable of Full HD video recording and it runs Android 4.1 Jelly Bean operating system.

With such specifications, LG Optimus L3 is priced at a reasonable $149 without a contract.

The post MetroPCS soon to Launch Nokia Lumia 521 and LG Optimus L3 appeared first on Techmell.

You are going to Miss Fingerprint Scanner in Samsung Galaxy Note 3

Posted: 26 Jul 2013 03:59 PM PDT

Samsung Galaxy Note 3 is expected to be out in a few months from now and as rumored for all the next generation high-end Smartphones, it was supposed to come with a fingerprint detector as a hardware button to increase the security. Unfortunately, the recent turn of events has made it highly unlikely that any such feature is going to be added in Note 3.

FingerprintRecent news from ET News has revealed Validity Sensors,  the contractor Samsung hired for making these fingerprint sensors, is not able to complete the order and so Samsung Galaxy Note 3 will not have them at all. This piece of information from the Korean website also indicates Note 3 is near completion as more information will come out as the tests begin.

Similar issues have been encountered by Apple with fingerprint sensors, meaning fingerprint option will not be very popular among Smartphones this year.

The specifically based on rumors are expected to be a 5.9 inch Note 3 having a 1080p HD Super Amoled Plus display screen running the recently released Android Jelly Bean 4.3 on a 3Gb RAM backed by 2 GHz Octa processor and 32GB, 64GB or 128GB of internal memory. The device is also rumored to have a 13 Megapixel rear and 3 Megapixel front cameras.

Rumors have also been circulating about flexible displays but this is not expected to be the case with Note 3 since these phablets are larger versions of Samsung Galaxy S series.

We are hoping to bring more on Note 3 as the release date is just about two months from now, expectedly. The phablet is definitely aiming at becoming the top of the line machine with more power than other Smartphones but it will have to fight for the rank with Sony's Xperia Z Ultra and Apple's 'rumored' intentions of launching phablet versions of iPhone 5s or iPhone 6.

Check back for more information on the upcoming Samsung Galaxy Note 3!

Source: ET News (Korean Website)

The post You are going to Miss Fingerprint Scanner in Samsung Galaxy Note 3 appeared first on Techmell.

App Ops Permission Manager for Android 4.3 Jelly Bean

Posted: 26 Jul 2013 01:22 PM PDT

A number of new features were released with Android 4.3 including adding support for more than one profile on the same device but with the restricted profile option given in the update along with Google Play Games following Apple's Game Center. There is, however, another feature not fully revealed to the users, the App Ops that provides administration of app permissions.

App OpsFor now, this App comes as a hidden app in Android 4.3 probably owing to the app not being fully prepared to be revealed yet. More curious users can still have the App Ops functioning by installing a third party app to unlock hidden app permissions. Once done, you will be able to control which app has permission to do what on your device for each app installed.

Think of it as an ability to stop certain apps from access your personal information, contact list, call log or even locate you using GPS – a pretty good feature for users who have their privacy amongst top priorities. Controlling the automatic GPS function in apps can also increase the battery time for your Smartphone.

The time when Google intends to unlock the App Ops is still unknown but finding out about such an app is certainly an indication towards Google's growing concerns over user privacy hence the power granted to user to tweak the settings suiting the privacy level they wish to achieve.

App Ops also means you can say no to permissions an app uses to get hold of data we are unaware of. It might result in us actually ending up reading App permissions which we conveniently overlook when installing an app.

Download App Here

The post App Ops Permission Manager for Android 4.3 Jelly Bean appeared first on Techmell.

Download & Install Official Android 4.3 Factory Image on your Nexus Device

Posted: 26 Jul 2013 09:22 AM PDT

After the declaration of Android 4.3 Jelly Bean additive upgrade and the advanced features in an event, Google has assured the users that the firmware will soon start roaming through OTA for Nexus 4, 7 and 10, Galaxy Nexus and the further for Google Play devices too. Yet, if you are not having so much patience, or just intend to follow the shortest path to a custom last stockpiling ROM, you need to install the update at this time the use of official images of plant this end Nexus be pushed site Google developers. Directions and download link can be found below.

Android Factory 4.3The steps for factory image flashing on your Nexus Smartphone or tablet are pretty easy, objective does have some requirements. Go through the following instructions attentively. First, read our disclaimer at the end of this tutorial.

Prerequisites

  • You need a Nexus 7, 4 or Nexus 10 with a bootloader that should be unlcoked.
  • You also need Android 4.3 factory image for the Nexus Smart phone or tablet you will use during this process. [Download Here]
  • Make sure that the Android SDK is installed on the desktop you are using during this procedure and the drivers for your Nexus device should be configured.

Directions to Install Official Android 4.3 Factory Image

Step 1: You should get the backup of the necessary documents and data that exists on the internal SD card because if something bad happens, you can recover all of the data. The users who have installed TWRP or ClockworkMod to their desktops, also backup all your data before installing Android 4.3 factory image on your nexus device.

For TWRP use this video Guide.

For ClockworkMod use this video Guide.

Step 2: Once you have taken the backup of your necessary data, Android 4.3 Factory Image that has been downloaded with the help of 7-Zip type of archiving program should be extracted. Now the TAR file should be extracted as well.

Step 3: Turn off your Nexus device and keep pushing down the Volume down and up buttons for booting your device into fastboot mode. Now keep pressing the Power key to view the bootloader mode.

Step 4: Now attach the Nexus device with your PC with the help of a USB. If you did not install fastboot drivers earlier, they will automatically be installed now.

Step 5: Now launch the pre-extracted directory and run the batch file named "flash-all.bat". If you are using Windows, you will run the above mentioned file and if you are using Linux or Terminal, you need to add "./flash-all.sh".

That’s all – Now have some patience until the process completes. Your Nexus device needs to reboot to Android 4.3 while the flashing is going on.

Disclaimer: Techmell blog is not responsible for any kind of damage to your devices, please try this tutorial at your own risk.

The post Download & Install Official Android 4.3 Factory Image on your Nexus Device appeared first on Techmell.

How to win at games

Visit GamesRadar.com now! | View in Browser | View on mobile device | Unsubscribe | Forward to a friend
GamesRadar

Hi Gamers

I'm a fan of the redeemer myself

– Sophia Tong, Editor in Chief - @sophiatong

Top 7 Most Overpowered Weapons In Multiplayer

Some weapons were made to make you feel like an intergalactic badass with something to prove. We do honor to the most OP weapons ever made
8 Instances Where Nintendo Was Worse Off Than It Is Now

Now THAT was a disaster
Read More  Share on Facebook  Share on Twitter
What If More Games Had Nostalgic Historical Vintage Modes

Who needs modern tech? Not these games
Read More Share on Facebook  Share on Twitter
8 Mundane Jobs That Should Be Simulation Games

A sim for everyone
Read More Share on Facebook  Share on Twitter
How The XCOM FPS Became The Bureau: XCOM Declassified

The many faces of 2K's newest shooter

You are receiving this e-mail as a current or former subscriber to GamesRadar magazine who opted in to receive email communications. To unsubscribe from this list please click here

This e-mail message was sent from a notification-only address that cannot accept incoming e-mail.
Please do not reply to this message
.


This email was sent by: Future US, Inc. 4000 Shoreline Court, Suite 400, South San Francisco, California, 94080